Sunday, June 30, 2013

JustRite Papercraft July Release - Samantha Walker Christmas Release

Hello Friends!
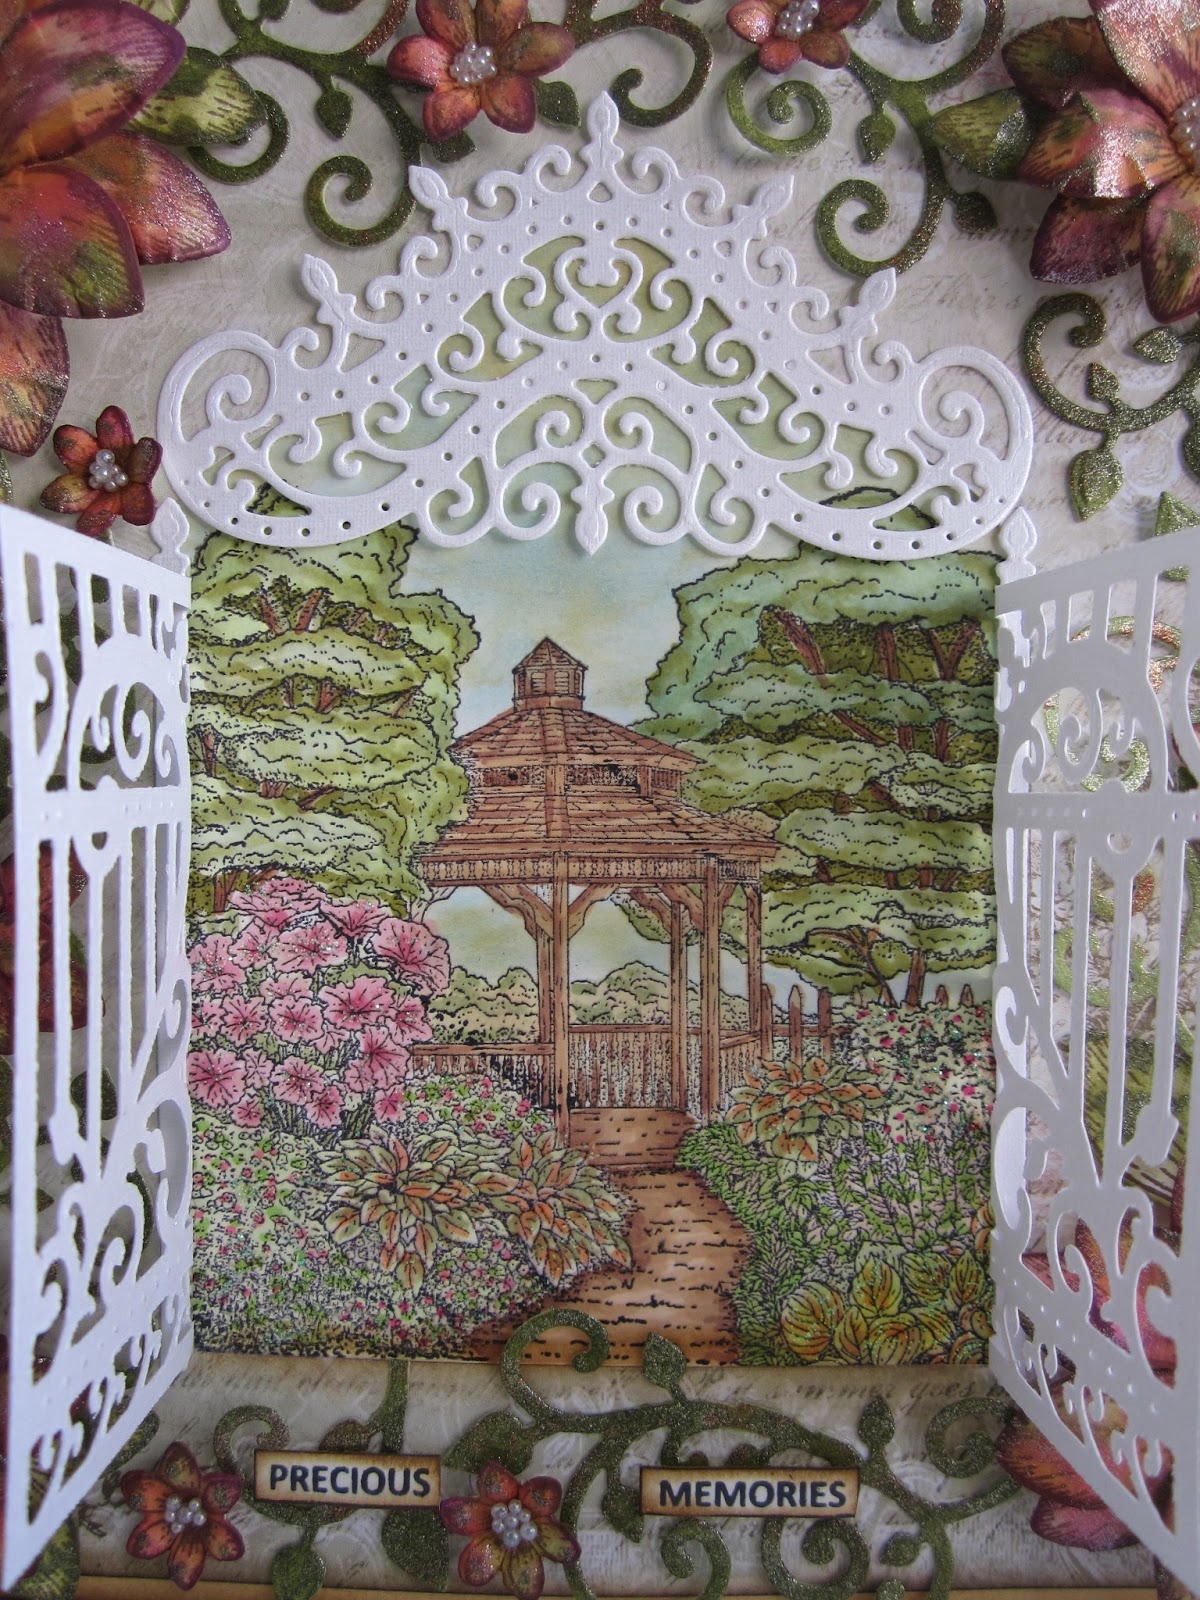
Welcome to Day 2 of the JustRite Papercraft July Release! Today's set is called O Holy Night, a beautiful set of 10 clear stamps perfect for your Christmas cards. Here is the card I created with this set.


Justrite Papercraft| Samantha Walker Stamps |  cling stamps |O Holy Night Stamps  |


Instructions:

1. Make a  5" x 7" card base with pearl metallic cardstock.
2.  Cut next layer using designer paper to 4 7/8" x 6 7/8", color edges with distress ink and adhere to card base.
3 Die cut fancy frames using Spellbinders  5 x 7 Elegant Labels 4 using pearl metallic cardstock.
4. Using designer paper die cut second label from the Spellbinders Grand Labels Four set and largest label from the Labels Four set.
5. Using O Holy Night set, stamp Nativity image and sentiment on small label using black ink. Layer labels on card base using foam squares.
6. Die cut flowers and leaves using Spellbinders Bitty Blossoms. Attach flowers to card, embellish with pearls and make a bow using pink seam binding.

Supplies:

JustRite Papercraft Stamps: O Holy Night
Spellbinders Dies: 5 x 7 Elegant Labels 4, Bitty Blossoms, Grand Labels 4, Labels Four
Other Supplies: Pearl Metallic Cardstock, Prima Marketing Journal Pad, Pearls, Rangers Distress Inks, Memento Black Tuxedo Ink, Foam Squares, Pink Seam Binding Ribbon from The Stamp Simply Ribbon Store.


Please be sure to visit each of the JustRite Papercraft Design Team Members below to see what they have created to share with you.


Thanks for visiting! Hugs!

Marisa


Friday, June 28, 2013

Samantha Walker Design Team & JustRite Design Team Blog Hop

Hello Friends!
Welcome to the second day of the Samantha Walker Design Team & JustRite Papercraft Design Team Blog Hop!
See below for more information about the Amazing Prize Giftaway and also 25% off all stamps and dies designed by Samantha Walker!!
For my card, I decided to make an Easel Card using the beautiful JustRite stamp set called Ooh La La French Frills by Samantha Walker which also coordinates with the Spellbinders French Frills die set.


         Welcome to Justrite Stampers | Free card making idea with supply lists, scrapbooking and craft ideas with rubber stamps, clear stamps and cling stamps | Secure ordering online. | Ships in 24 hours.                     French Frills,Spellbinders™ Shapeabilities® dies cut, emboss and stencil with a single die template.


Instructions:

1. Cut a 5"x 7" card base using gray metallic cardstock. Crease front of card at half point and fold. Cut a 5" x 7" panel using metallic cardstock and adhere to front of card taping only lower portion to make the easel card.
2. Cut 2 designer cardstock panels measuring 4 7/8" x 6 7/8", color edges with distress ink and adhere to card front and inside of card.
3. Die cut 2 metallic cardstock frames using the largest die from Spellbinders  5 x 7 Elegant Labels 4 set, adhere to designer cardstock.
4. Die cut 2 labels with designer cardstock using the second die from Spellbinders Grand Labels Four, adhere to frames.
5. Die cut dress forms and label for sentiment using Spellbinders French Frills die set. Stamp dress forms, label and sentiment from the JustRite Ooh La La French Frills stamp set, color with Copic markers and adhere to die cut pieces and then onto card. Add tulle skirts to dresses.
6. Die cut flowers and leaves using Spellbinders Bitty Blossoms, Foliage, and Venetian Motifs for the swirls. Shape flowers, color with distress inks and arrange on card as pictured.
7. Embellish card with pearls and a silk ribbon bow.

Supplies:

JustRite Papercraft Stamps: Ooh La La French Frills
Other Supplies: Gray Metallic Cardstock, Prima Marketing Journal Pad, Tuxedo Black Memento Ink, Copic Markers, Pearls, May Arts Silk Ribbon, Foam Squares, Tulle.


Love what you see?  You're in luck!  Samantha's JustRite Stamp Sets and Die Sets 
will be on sale for 25% off today through 6/30!
Just click HERE to get yours!


Just enter through the Rafflecopter widget below for your chance to win!

Be sure to visit the following blogs to see the beautiful projects the ladies from the JustRite Design Team and Samantha Walker Design Team have created.


Thanks for visiting! Hugs!

Marisa


Tuesday, June 25, 2013

Heartfelt Creations Wednesday - Sun Kissed Fleur White Gift Box

Hello Friends!

Today we are doing a cross promotion with Scor-Pal.  Please visit the Heartfelt Creation blog at www.heartfeltcreations.us/blog and the Scor Pal blog at www.scor-pal.blogspot.com/.  Prepare to be blown away with all the amazing projects featuring the Scor-Pal and Heartfelt Creations products.


Heartfelt Creations Supplies:

Other Supplies:
Neenah Paper Natural White, Scor-Tape 1/8”Double Sided Adhesive, Memento Ink Pad in Rich Cocoa, Ranger Distress Ink Pads in Gathered Twigs, Shabby Shutters, Victorian Velvet,  Glue Gun.

Instructions:
1. Gift box is 3 ½”  x  2 ¼ “.  Using largest die from the Gift Ensemble Die set, die cut 4 pieces with natural white cardstock.
2. Cut 4 panels using Daphne Paper Collection measuring  3 3/8” x 2 1/8”, color edges with distress ink and glue to gift box sides.


3. Die cut 4 gates from the Ornate Gateway Die set and tape to gift box sides using Scor-Tape 1/8” Double Sided Adhesive.
4. Fold gift box sides at creasing lines and tape lacey sides together to form box using Scor-Tape 1/8” Double Sided Adhesive.  Fold top and bottom flaps at creasing lines and close by overlapping flaps and tucking the last flap under the first one.


5. Using Sun Kissed Fleur PreCut Set, stamp flowers and leaves on natural white cardstock, die cut with coordinating Sun Kissed Fleur Die. Color flowers and leaves with distress inks, shape petals and layer to form flower. Die cut leafy swirl from the Gift Ensemble Die set and color with distress ink.


6. Die cut tiny flowers from the Gift Ensemble Die set, shape and color with distress ink and glue to gift box lacey sides.


7. Arrange flower, leaves and swirls to top of box as pictured.

Thanks for visiting! Hugs!

Marisa


Tuesday, June 18, 2013

Heartfelt Creations Wednesday - Thinking of You Tag

Hello Friends!
Today I have this tag I created using the new Gateway To The Seasons Collection. This is another collection of beautiful papers, dies and rubber stamps. The flowers were stamped with last month's collection Striped Sun Kissed Fleur stamp and die cut with Sun Kissed Fleur Die. With this stamp, you can stamp all 12 flowers at one time and die cut them all with one die, this makes it really simple and fast to make all the flowers in this tag. To watch a video on how to make these flowers go HERE.


Heartfelt Creations Supplies:

Other Supplies:
Paper Temptress Iridescent Vellum, Pearl Metallic Cardstock, Tsukineko Memento Ink in Black Tuxedo, Versamark, White Embossing Powder, Heat Gun, May Arts Silk Ribbon, Rangers Distress Inks, Micro Beads, Rangers Glossy Accents, Copic Markers.

Instructions:
1. Tag measures 3 ½” x 9”. Cut pearl metallic cardstock to 3 ½” x 6”, cut another  3 ¼” x 9” layer using Daphne Paper Collection, color edges with distress ink and adhere to tag base.
2. Die cut 2 top swirls from the Ornate Gateway die set and glue to top and bottom of the tag base.
3. Stamp bird house on tag using black ink, color with Copic markers.
4. Stamp Striped Sun Kissed Fleur flowers on vellum using Versamark and then white embossing powder, heat set. Die cut flowers with Sun Kissed Fleur die. Color flowers with distress inks, shape petals and layer to form flowers. Glue micro beads to center of flowers using Glossy Accents. Arrange flowers on tag as pictured.
5. Die cut leaf swirls from the Gift Ensemble die set and glue under flowers.
6. Stamp All Seasons Sentiment stamp, cut out the words Thinking of You and glue to tag.
7. Make a bow with silk ribbon and adhere to tag.

Be sure to visit the Heartfelt Creations Blog for more inspiration.

Thanks for visiting! Hugs!

Marisa

Tuesday, June 11, 2013

Heartfelt Creations June Release - Precious Memories Card

Hello Friends!
We are pleased to introduce the Gateway To The Seasons Collection. The Ornate Gate Die is adorned with a flourishing design and a large, exotic accent piece. Lace, gazebos, birdhouses, gardens, backyards, a fall scene, a winter home and sentiment stamps will add joy to your cards and a smile to your face. These scenes and sentiments will complete your stamp collection. The Daphne paper pack is loaded with lacy Victorian patterns in soft pink, cream and greens accented with red, green and brown. Classic Heartfelt Creations images combined with stripes, diamonds and vintage type, tags and journaling blocks create a collection you will treasure forever! Leave a comment on the Heartfelt Creations Blog by June 18th and you will be eligible to win the entire release valued at $150.00.


Heartfelt Creations Supplies:

Other Supplies:
Neenah Natural White Cardstock, Pearl Metallic Cardstock, Rangers Distress Inks, Memento Tuxedo Black Ink, Copic Markers, Stampendous Tiny Beads, Adhesive Foam Squares,  Rangers Glossy Accents.

Instructions:
1.Card base measures 7” x 7”.  Stamp Gazebo in the center of card base, color with Copic markers. Cut a 6 ¾”  x  6 ¾” layer using Daphne Paper Collection and cut center out to expose Gazebo, adhere to card base.
2. Die cut Ornate Gateway Die with metallic cardstock, adhere to card.
3. Stamp Sun Kissed Fleur flowers on natural white cardstock, die cut flowers with Sun Kissed Fleur Die. Color with distress inks and metallic paints, shape and layer to form flowers.  Embellish flowers with small beads in the center with Glossy Accents.
4. Die cut leaf swirls from the Gift Ensemble die set, color with distress inks and metallic paint. Arrange flowers and leaf swirls around card as pictured.

5. Stamp All Seasons Sentiment and cut out the words Precious Memories and adhere to card.

Be sure to visit the Heartfelt Creations Blog for more inspiration.

Thanks for visiting! Hugs!

Marisa

Monday, June 3, 2013

JustRite Papercraft June Release - Hope You Feel Better Soon Card

Hello Friends!
Welcome to the last day of the JustRite Papercraft June Release. Today we have 2 beautiful background stamps to show you, Leafy Background Stamp and Autumn Swirls Background Stamp. For my card I decided to use the Leafy Background Stamp.


           Welcome to Justrite Papercraft | Free card making idea with supply lists, scrapbooking and craft ideas with rubber stamps, cling stamps background stamps | Samantha Walkers| Leafy Background Stamp          Welcome to Justrite Papercraft | Free card making idea with supply lists, scrapbooking and craft ideas with rubber stamps, cling stamps background stamps |Fall Background Stamp| Autumn Swirl Background Stamp


I started by making a 5" x 7" card base using natural white cardstock, I added 2 more layers to card base using designer paper and natural white cardstock.
I die cut the largest die from Spellbinders 5 x 7 Elegant Labels Four using designer paper and adhered to card base.
I stamped the Leafy Background Stamp using Versamark and Gold Embossing powder. I then die cut the background with the number 2 die from the set Grand Labels Four. The sentiment was also embossed and die cut with Labels Four.
The flowers were die cut with the 2 smallest dies from the set Grand Peony Creations and embellished with bronze pearls. The swirl was die cut with Floral Flourishes and the leaves with Foliage.
The bow was created with seam binding ribbon from The Stamp Simply Ribbon Store.


Supplies:
JustRite Papercraft:  Leafy Background Stamp, Chicken Soup Labels Four
Spellbinders: 5 x 7 Elegant Labels Four, Labels Four, Grand Labels FourGrand Peony Creations, Floral Flourishes, Foliage
Other Supplies: Bo Bunny Decaf Vintage Cardstock, Neenah Natural White Cardstock, Versamark, Stampendous Gold Embossing Powder, Versamark, Ranger Distress Ink in Brushed Corduroy, Bronze Pearls, Seam Binding Ribbon from The Stamp Simply Ribbon Store


Please be sure to visit the other Design Team Members Blogs to see their beautiful creations. 

Thanks for visiting! Hugs!

Marisa

Saturday, June 1, 2013

JustRite Papercraft June Release - Wishing Health & Happiness Card

Hello Friends!
Welcome to Day 3 of the JustRite Papercraft June Release! Today we have 2 beautiful sets to show you, Doilies & Lace and Sweet Lace Background Stamp.


       Justrite Papercraft Doilies & Lace, scrapbooking and craft ideas with  stamps,  | Clear stamps |            Welcome to Justrite Papercraft | Free  scrapbooking and craft ideas with rubber stamps, cling stamps background stamps |  | Sweet Lace Background Stamp


For my card today I started by cutting the card base to 5" x 7" using kraft cardstock. I stamped Sweet Lace Background Stamp on designer paper using Versamark and white embossing powder and adhered to card base.
For the square doily I stamped the corners to a 3 3/4" square of designer cardstock using Versamark and white embossing powder. The round doily was die cut with Spellbinders Standard Circles Large. The flower doily was fussy cut and adhered to card with adhesive foam squares.
I stamped the borders 3 times and then die cut with coordinating Classic Edges One.
The flowers and leaves were die cut with Rose Creations and the swirls with Fantastic Flourish One
The bow was created with seam binding ribbon from The Stamp Simply Ribbon Store.


Supplies:
JustRite Papercraft: Doilies & Lace and Sweet Lace Background Stamp
Spellbinders: Rose Creations, Classic Edges One, Fantastic Flourish One, Standard Circles Large
Other Supplies: Bazzill Kraft Cardstock, Prima Marketing Journal Pad Cardstock, Versamark, Stampendous White Embossing Powder, Rangers Distress Ink in Brushed Corduroy, Seam Binding Ribbon and pearls from The Stamp Simply Ribbon Store,  Adhesive Foam Squares.

Please be sure to visit the other Design Team Members Blogs to see their beautiful creations.

 JustRite Inspiration
Debbie Olson 
Eva Dobilas
Darsie Bruno
Marisa Job
Michele Kovack
Angela Barkhouse
Kathy Jones 
Margie Higuchi 
Barb Schram
                                                                            Thanks for visiting! Hugs!

Marisa