Tuesday, May 29, 2012

Have a Wonderful Birthday Gift Box - Heartfelt Creations

Hello Friends!
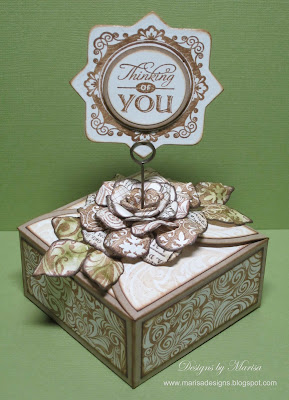
Welcome to Heartfelt Creations Wednesday! Today I have this gift box I created using more beautiful images from Heartfelt Creations's Old English Garden Collection. I love the flower images in this collection, they are vintage and they layer beautifully, they almost look real! I made the box using the Square Petal Top Box die template by Spellbinders.


Instructions:

1. For the Box: Die cut and emboss box with  Square Petal Top Box die using Design Paper Cardstock and run through the Grand Calibur Machine. Stamp Blossom Swirl and Blossom Spray from the Tattered Blossom Swirls PreCut Set on box with brown ink and color flowers with Copic Markers. 


2. Assemble box by adhering corner tabs with strong tape. The box measures 2 ¾” x 2 ¾”.


3. For the Flower: Stamp Tattered Blossoms PreCut Set on design Cardstock, 2 of each flower with brown ink. Cut them out with coordinating dies from the Tattered Blossoms Die set  and color with Copic Markers.  Bend and shape the petals and layer as pictured. Stamp leaves from Distressed Leaves PreCut Set with brown ink and die cut with coordinating die from the Nested Leaves Nestabilities set. Color with Copic Markers and adhere to flower.


4. For the Sentiment: Stamp sentiment from Inspire Me Sentiments PreCut Set  and cut with a round punch. Die cut Persian Motif and glue behind sentiment. Use a Memo pin to hold sentiment and insert in flower center. Embellish with pearls.


Products Used on This Project

Other ProductsSquare Petal Top Box Die Template and PersianMotifs Die Template (Spellbinders), Decaf Vintage Cardstock (BoBunny), Memento Rich Cocoa Ink (Tsukineko), Brushed Corduroy Distress Ink (Ranger), Copic Markers: R81, R85, R89, G82, G85, Pearls (Want2Scrap), Scor-Tape.


Be sure to visit the Heartfelt Creations Blog to see all the beautiful projects created by the Design Team.

Thanks for visiting! Hugs!

Marisa
Friday, May 25, 2012

Spellbinders Guest Blogger! Life is Better with Friends Candy Basket

Hello Friends!
I am very excited to share with you another post as a Guest Spellblogger for Spellbinders Paper Arts! The theme this week is Versatile Edgeabilities dies. For my project using Edgeabilities I decided to make a candy basket using the Hexagon Petal Envelope die template by Spellbinders. I also used JustRite Paper Craft stamps for the sentiment and pretty medallion and Heartfelt Creations stamps for the flowers.
Please go to The Spellbinders Blog by clicking HERE to see Step by Step Instructions on how I made this candy basket.


Thanks for visiting! Have a great weekend! Hugs!

Marisa

Tuesday, May 22, 2012

Heartfelt Creations Thanks a Bunch Easel Card

Hello Friends!
Every Wednesday I will be showing you my creations using Heartfelt Creations rubber stamps and coordinating dies. This week I decided to make an Easel Card, and as the focal point I am using the rubber stamp Blossom Bouquet from the Tattered Blossom Swirls PreCut Set.


Instructions:

5 ½” x 5 ½” Finished Card Size
1. Make Easel Card base with Pearl Metallic Cardstock (instructions for Easel Cards can be found on Split Coast Stampers), using Grand Scalloped Squares Nestability. Cut 2 Designer Paper mats measuring   5” x 5” and adhere to card base.
2. Stamp Blossom Bouquet from the Tattered Blossom Swirls PreCut set onto Natural White Cardstock and color with Copic Markers. Die cut Bouquet with Labels 20 Nestabilities.
3. Stamp and die cut Tattered Blossoms flowers, color with Copic Markers and layer on Blossom Bouquet using Foam Squares. Stamp and die cut leaves, color with Copic Markers, arrange under flower and adhere to card corner.
4. Die cut 4 Decorative Corners and attach under Blossom Bouquet.  Adhere to center of card front. Embellish flowers with Pearls.


5. Stamp Thanks a Bunch sentiment and Blossom Spray on Natural White Cardstock and die cut with Label 20 Nestabilities. Color spray and distress sentiment, adhere to card using Foam Squares.


6. Make a bow with silk ribbon and attach to card. Embellish corners with Pearls. Here is the finished card:


Heartfelt Creations Products:

Other Products:
Grand Scalloped Squares Nestability (Spellbinders), Pearl Metallic Cardtock (Stardream), Nature Garden Paper Collection ( Prima Marketing), Natural White Cardstock (Neenah), Memento Rich Cocoa Ink (Tsukineko), Distress Ink Frayed Burlap (Ranger), Copic Markers: RV95, RV91, RV93, RV34, YG97, YG93, Pearls (Zva Creative), Silk Ribbon (May Arts),  3D  Foam Squares (Scrapbook Adhesives), Nestabling (Want 2 Scrap).

I hope you are inspired to make an Easel Card, they are actually really simple to make. Please visit the Heartfelt Creations Blog to see the other Design Team Members beautiful creations.


Thanks for visiting! Hugs!

Marisa


Friday, May 18, 2012

Happy Birthday To You Card - JustRite Friday Challenge

Hello Friends,
Today I would like to share this "Happy Birthday To You" card I created using JustRite Papercraft rubber stamps and Spellbinders die templates. This week JustRite Friday Challenge #073 is "Anything but Square", you can make a card or project in any shape but square. Here is my take on the Challenge this week:


For this card I used Vintage Rose MedallionsNested Oval Medallions Labels Dies,  Anchors Away, and Vintage Label & Banner Dies by JustRite Papercraft.

Welcome to Justrite Stampers | Free card making idea with supply lists, scrapbooking and craft ideas with rubber stamps, clear stamps and cling stamps | Secure ordering online. | Ships in 24 hours.         Spellbinders Nestabilities are paper cutting and embossing dies sold in sets They create paper shapes at 1/4th and 1/8th inch increments that help create cards and scrapbooking pages with stunning visual effects. They are universal and work in most die cu     Welcome to Justrite Stampers | Free card making idea with supply lists, scrapbooking and craft ideas with rubber stamps, clear stamps and cling stamps | Secure ordering online. | Ships in 24 hours.      Spellbinders Nestabilities are paper cutting and embossing dies sold in sets They create paper shapes at 1/4th and 1/8th inch increments that help create cards and scrapbooking pages with stunning visual effects. They are universal and work in most die cu

Instructions:

1. To make the card base, fold kraft paper in half and die cut using Grand Labels Twenty Three, die #4, with #1 being the smallest. Cut a rectangle measuring 6 1/4" x 4 3/4  from design paper and adhere to card base.

Grand Labels Twenty-Three

2. Cut another rectangle measuring 6 1/4" x 1 3/4" and emboss with Elegance M-BossabilitiesDesign A, embossing folder by Spellbinders. Tape to center of card. 

 Elegance

3. Die cut borders and doily using Persian Motifs and Persian Accents with kraft paper. Adhere borders to embossed rectangle.

 Close this windowClose this window

4. Stamp label from the Vintage Rose Medallions set and color with Copic Markers. Die cut with coordinating die from the Nested Oval Medallions Labels set. 

5. Stamp Happy Birthday To You Banner from the Anchors Away set and die cut with coordinating die from the Vintage Label & Banner Dies set. Adhere to center of label using foam squares, then adhere label to doily using foam squares again and center on card.

6. Die cut flowers and leaves using Bitty Blossoms by Spellbinders. Roll flowers and glue at the base to secure and then shape petals. Distress flowers and leaves with Distress Inks. 

Close this window

6. Layer the leaves and flowers along left side of the label as picture below shows.


I hope you are inspired to participate in the JustRite Friday Challenge this week. Visit their blog at JustRite Inspiration for more details and samples from the other Design Team members.

Project Supplies:
Other Supplies: Nature Garden Paper Collection by Prima Marketing, Kraft Paper by Bazzill Basics, Peeled Paint and Frayed Burlap Distress Inks by Ranger, 3D Foam Squares by Scrapbook Adhesives, Pearls.

Thanks for visiting and have a great weekend! Hugs!

Marisa

Tuesday, May 15, 2012

Just Thinking About You - Side Step Card

Hello Friends!
Today, I would like to share this card I created using Heartfelt Creations rubber stamps and coordinating Spellbinders dies. The tea cups and flowers are from the new May Release, these beautiful new sets are part of the new Old English Garden Collection.


Instructions:

Size of finished card  6” x 8”.
1. Make Side Step Card base with Brown Metallic Cardstock (instructions for Side Step Cards can be found on Split Coast Stampers).  Cover each section with Designer Paper. 
2. Stamp tea cups from the China Fragments set on Natural White Cardstock with Memento Ink. Die cut tea cups with coordinating dies from the Nested Tea Cups set.  Color with Copic Markers and sponge lightly with distress ink.
3. Stamp flowers from the Tattered Blossoms set on Designer Paper. Die cut flowers with coordinating dies from the Tattered Blossoms Die set. Shape flowers and layer with foam squares.
4. Stamp leaves from the Distress Leaves set on Designer Paper. Die cut with coordinating die from the  Nested Leaves set.
5. Stamp sentiment from the Heartfelt Expressions set on Natural White Cardstock and die cut with Labels Four Nestabilities. Stamp small flower spray from the Tattered Blossom Swirls set and color with Copic markers. Die cut brown label and adhere to back of sentiment to create mat.
6. Arrange finished sentiment, flowers, leaves and tea cups on card base as shown.  Embellish with pearls and a silk bow.

Heartfelt Creations Products Used on This Project:

Spellbinders Products:

Other Products:
Brown Metallic Cardstock (Stardream), French Kiss Floral Designer Paper (Glitz), Natural White Cardstock (Neenah), Memento Tuxedo Black Ink (Tsukineko), Copic  Markers:  E30, E11, E33, YR02, YG91, YG95, C00, C3, C5, Silk Ribbon (May Arts), Frayed Burlap Distress Ink (Ranger), Pearls (Zva Creative), 3D  Foam Squares (Scrapbook Adhesives).

Please visit the Heartfelt Creations Blog to see beautiful samples created by the other Design Team members.

Thanks for visiting! Hugs!

Marisa


Thursday, May 10, 2012

Happy Father's Day Candy Box

Hello Friends!
Today I would like to share with you these candy boxes that I made in no time, all the work is in the stamp and coordinating die. The beautiful stamp is from the new set Going Places Vintage Labels by JustRite Papercraft, it is perfect for Father's Day, graduations, and other occasions. The coordinating JustRite die is from the new set Vintage Label & Banner Dies, this die template set is custom designed by Spellbinders.


Here are the easy instructions on how to make the smaller box:

1. To make the box, first cut a 3  3/4" square base with beige cardstock. Score a 1/2" mark on 4 sides and cut the corners out.


2. Stamp 4 of the smaller label from the cling stamp set Going Places Vintage Labels on beige cardstock using brown ink. Die cut using coordinating die from the set Vintage Label & Banner Dies by running it through the Grand Calibur machine by Spellbinders. Glue the 4 labels on each side of the square just before the crease line as picture below shows.


Spellbinders Nestabilities are paper cutting and embossing dies sold in sets They create paper shapes at 1/4th and 1/8th inch increments that help create cards and scrapbooking pages with stunning visual effects. They are universal and work in most die cu          Welcome to Justrite Stampers | Free card making idea with supply lists, scrapbooking and craft ideas with rubber stamps, clear stamps and cling stamps | Secure ordering online. | Ships in 24 hours.


3. Also die cut 4 blank labels for the inside of the box in brown cardstock. Glue brown labels on the inside of the box.


4. Color image using Copic markers. Punch small holes on each corner as picture below shows.


5. To form the basket, tie a bow in each corner using Crafter's Cord. For the tag, I used the Happy Father's Day stamp from the new set Anchors Away and die cut it with Nested Medallion Labels by JustRite Papercraft. 
For the larger box, use the larger label stamp in the set and cut the square base 4 3/4" and then follow the same steps. 
Here is the final project:


Project Supplies:
Spellbinders: Grand Calibur
Other Supplies: Memento Rich Cocoa Ink, Crafter's Cord, Copic Markers, Rangers Distress Ink Pad


Thanks for visiting! Have a great weekend! Hugs!

Marisa

Tuesday, May 8, 2012

Heartfelt Creations Old English Garden Collection - Tattered Collage Wall Hanging


Hello Friends!
We are delighted to present the Old English Garden Collection. Come have a cup of tea with us in our Old English Garden. With flower blooms as fresh as the morning dew and cracked walls as old as the dirt beneath it, this set offers a rustic flavor. The typography flows as smoothly as a calm spring breeze. Be sure to grab the custom die for maximum creative versatility and fun 3D depth! There are 6 new PreCut Stamp Sets and one beautiful new exclusive Spellbinders die designed for Heartfelt Creations.
Leave a comment on the HC Blog by May 15th and you will be eligible to win the entire release valued at $141.99. The winner will be announced on May 16th on the HC Blog.


 For my project I decided to make a Wall Hanging using the new "Tattered Collage Stamp" and a flower border using the new "Tattered Blossoms" flower stamps and coordinating "Tattered Blossoms Die".

Instructions:

Size of finished product:  8” x 8”
1. Cut a 6 ½” x 6 ½” square with creme cardstock for the base. Stamp and emboss Tattered Collage using bronze embossing ink. 
2. Die cut 12 scallops using Layered Scalloped Posy dies and attach around base, 3 scallops for each side. Color the flowers and leaves with Copic markers.


3. Stamp flowers with Memento Rich Cocoa ink on creme cardstock using the 3 smallest stamps from the Tattered Blossoms set. Die cut with coordinating dies from the Tattered Blossoms Die set. Spray to color with Glimmer Mists and let dry. Shape petals and layer flowers with foam dots. Attach pearls to the center of the flowers.


4. Stamp leaves using Leaf Medley and die cut with coordinating die from Spellbinders Foliage. Spray leaves with Glimmer Mists.


5. Die cut several of the tiny flowers in the Layered Scalloped Posy Die set. Die cut several vines from the Decorative Chateau Gate Die set. Spray with Glimmer Mists to color.
6. Arrange flowers and leaves around frame and secure with glue.


7. Cut 2 pieces of ribbon measuring 15” long. Twist together and attach to the back of the base to make your project into a wall hanging.


Project Supplies:

Heartfelt Creations and Store Products Used:

Other Products:

Versamark Watermark stamp pad. Stampendous Copper embossing powder.
Memento Rich Cocoa ink pad.
Copic Markers:  G82, G99, YR02, YR21, RV 34, RV93.
Tattered Angels Glimmer Mist: Olive Vine, Meadow Green, Cherry Limeade, Cranberry Zing, Jack O’Lantern, Marmalade.
Bronze and white pearls.  Foam dots. Orange ribbon. Glue. Creme color cardstock.


Make sure to visit the other Design Team members to see their wonderful creations by going to the Heartfelt Creations Blog

Thanks for visiting! Hugs!

Marisa


Monday, May 7, 2012

JustRite Papercraft May Release Day Four - Thinking of You Gift Box

Hello Friends!
Today is the final day of the JustRite May Release. The Stamp Set released today is "Summer Words", I love this set, it has great sentiments for your summer special events. I decided to make a gift box that could be used for a girl's graduation, birthday or any other occasion.


Here is the new May Release stamp set "Summer Words":

Welcome to Justrite Stampers | Free card making idea with supply lists, scrapbooking and craft ideas with rubber stamps, clear stamps and cling stamps | Secure ordering online. | Ships in 24 hours.

I started out by making the flowers first. I stamped five different backgrounds on ivory card stock with Distress Inks in several brown tones. JustRite has great background stamps which allow you to create your own pattern paper!! These are the background  stamps I used: "Fleuriste Newsprint Background Stamp", "Shabby Music Background Stamp", "Vintage Wallpaper Background Stamp", "Elegant Fronds Background Stamp", and the new just realeased "Heart Scroll Background Stamp".


To die cut the flowers and leaves I used the die sets "Rose Creations" and "Foliage" by Spellbinders.


I used different backgrounds for the flowers to achieve more texture and dimension. Shape the petals and then layer them with foam dots to make the flowers.


I die cut and embossed the box using "Square Petal Top box" die template by Spellbinders with kraft card stock. To see a complete tutorial on how to make this box go to this "Link".


For the sentiment I stamped Thinking of You from the set "Summer Words" on ivory card stock with Memento Rich Cocoa ink. For the frame behind the sentiment I used "Friendship Blooms" and I die cut it with JustRite custom design die template "Nested Medallion Labels Dies". Assemble all the pieces together as pictured below and attach to a memo pin.


I hope I have inspired you to use JustRite background stamps to make your own pattern papers! Here is another picture of  the final project:


Project Supplies:

Other Products: Ivory and Kraft card stock, Memento Rich Cocoa Ink, Ranger Distress Inks, Memo Pin, Foam Dots, Tape

Please be sure to check out the rest of the Design Team members as they show you more projects of today's new May Release.

Thanks for visiting! Hugs!

Marisa